powerschool:powerschool:returningenrollment
How to Create a Returning Enrollment
BEGINNING WITH THE 2019-20 SCHOOL YEAR, WE WILL NEED TO CREATE A SEPARATE ENROLLMENT RECORD FOR THE TIME THAT A STUDENT IS PLACED ON HOMEBOUND (Medical reasons, HOMEBASED (w/ISAEP, Administrative Homebound), or HOME-EDUCATION (w/o ISAEP, Behavior reasons).
If a student returns to School from Homebound/Homebased/Home-Ed, you must create a new line of enrollment.
- For Homebound:
- Locate the student in PowerSchool
- Click on Functions under Enrollment
- Select Create New School Enrollment
- Set the Exit Date to the return date from Homebound back to school
- Select W201 (In-District Transfer) as the Exit Code
- Set the Entry Date to the return date from Homebound back into school (same as Exit Date above)
- Select R216 (Re-Entry From Homebound) as the Entry Code
- Type Exiting Homebound as the Comment
- Remove the Serving Division to set the default value
- Remove the Serving School to set the default value
- Click Submit
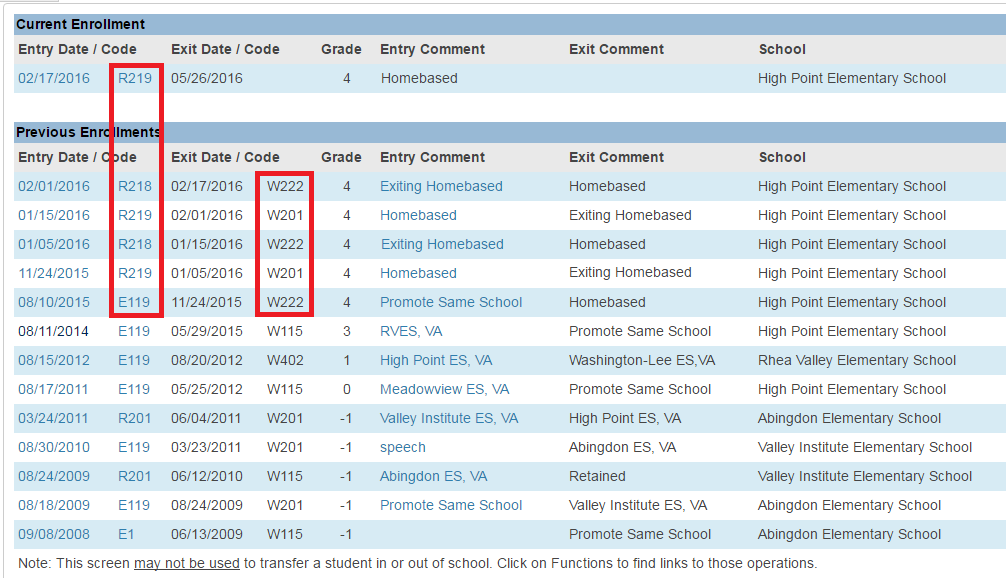
Once completed, the returning Homebound current enrollment should be similar to this entry.

- For Homebased (aka. Administrative Homebound):
- Locate the student in PowerSchool
- Click on Functions under Enrollment
- Select Create New School Enrollment
- Set the Exit Date to the return date from Homebased back to school
- Select W201 (In-District Transfer) as the Exit Code
- Set the Entry Date to the return date from Homebound back into school (same as Exit Date above)
- Select R218 (Re-Entry From Homebased) as the Entry Code
- Type Exiting Homebased as the Comment
- Remove the Serving Division to set the default value
- Remove the Serving School to set the default value
- Click Submit
If the student is enrolled in Home-Education, set the Serving School to Home Education Services (9991).
powerschool/powerschool/returningenrollment.txt · Last modified: 2024/11/18 13:52 by lokes

